
I thought I'd take photos as I went through the process of making this layout, so you can see what I do from start to finish!
Merry & Bright:

I knew that I wanted to use one current scrapbooking collection, as they're what I love right now, and are inspiring me lots, and I wanted to stick to one collection as it helps me scrapbook faster.
So I held the photo up against the three collections I have the most of - My Mind's Eye All is Bright, Pink Paislee's City Sidewalks, and the Crate Paper Sleigh Ride Collection. You can probably tell I decided on the Sleigh Ride collecton... sorry I don't have pics of the photo against the other collections, you'll have to believe me that this one went best!
Here's the bits I picked out of Sleigh Ride that I thought I might like to use (plus a bit of red cardstock):

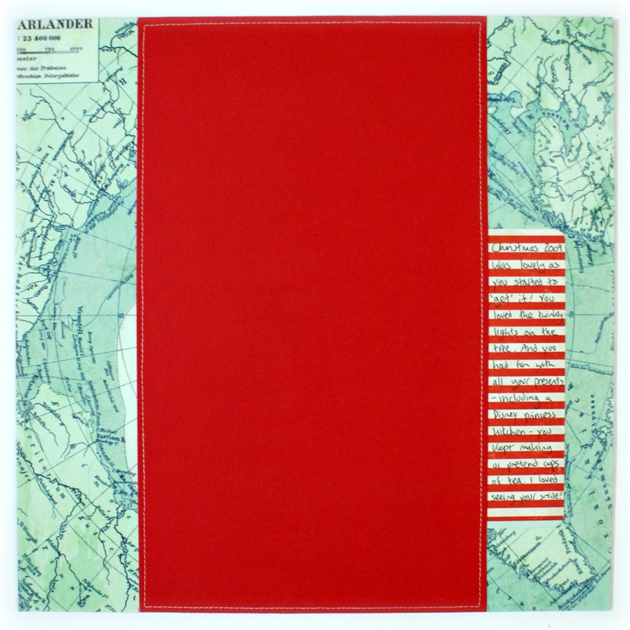
I wanted to use the piece of red cardstock behind the photo, as it helped the picture to stand out, and contrasted nicely with the 'Blue Christmas' background paper. So I moved the cardstock and photo around until I liked where it lay - I wanted the pattern on the background paper to look balanced:

Next I chose two pieces of 6x6 paper, and moved them about until I liked the placement - I didn't want to cover up too much of the red cardstock or the blue patterned background:

Once I'd decided to put the 6x6 papers towards the base in the centre, I knew I'd want to fill some of the empty gap above them, so I picked up three tags and moved them about:

At this point I realised the photo was disappearing a bit - because the red cardstock and the tags were so bright, it meant they were standing out more than the photo. So I needed to mat the photo to give it a defined edge and help it show up more - I tried a few colours before choosing to mount it on patterned kraft:

I cut the mat for the photo, and then wanted to check what else I might want on the page, without sticking anything down yet. I chose a few cardstock stickers, and stuck 3D foam dots onto the back, but I kept the paper that protects the sticky bit on them, so I could move them about on the layout:

I also realised I needed somewhere to journal, so I cut a piece of stripy paper, rounded the corners, and tried it out at the side:

Which I decided looked good as long as I balanced it out with the 'noel' sticker popping off the other edge of the cardstock.
I wrote the journaling, which reads:
'Christmas 2009 was lovely as you started to 'get' it! You loved the twinkly lights on the tree. And you had fun with all your presents, including a Disney Princess Kitchen - you kept making us pretend cups of tea. I loved seeing your smile!'
Now that I had everything where I wanted it, I started to stick it all together. I measured the red cardstock to make sure I had it in the centre:

I marked where it needed to go with pencil, and then stuck the journaling paper down first. I stuck the red cardstock on top, and then machine stitched all around it:
Then I worked out where the tags needed to go and drew rough pencil lines, but I made sure they were stuck on straight as I adhered them (sorry the colours on this photo are so bad):

I didn't bother drawing pencil lines for anything else, I just stuck the 6x6 papers down, using a ruler to check they were centred as I placed them - the glue I use (Helmar Tape Runner) is removeable so I could take them off and try again if I did it wrong!
The stickers and gems were placed by eye:

I like the 'All is Calm, All is Bright' sticker, as that's what the moment captured in the photo looks like, even though I know 30 seconds later Little Miss was running away from me to cause some mischief!

Be Inspired:
- Use stripy paper to write your journaling on
- Find a way to stop your stickers being sticky while you try to position them on your project
- Use tags or a similar shape to fill an empty gap
Don't forget that a comment on this post, or on any of my posts from this weekend, will count as an entry into the Grand Giveaway {NOW CLOSED} - but only if you've registered your interest in winning that here!
Is your process similar to mine? I'd love to know!
See you again real soon! x
24 comments:
lovely layout.
That looks great - and really interesting to see how you work. I'm going to have to revisit all of these again later when my visitors have gone home! Have a lovely day :o)
Super layout...love the papers you chose!
If I want to try a title for length and the letters have sticky backs I stick the very bottom of each letter to a clear ruler...then I can see if it will fit!! If it does I just tilt the ruler , press down the top of each letter and release the ruler and then press the bottom halves down!! This works for me!!
A lovely layout....you were right about matting the photo....I usually find I prefer the photos matted....gives them more definition.
I'm another one who likes to matt their photos!
That is a brilliant tutorial. I like to matt photos too - it makes them stand out more.
Lovely memory to scrap - and I really like your choice of papers, haven't seen those before!
Great insight into HOW a page comes together - the only thing I'd have done (apart from take twice as long moving stuff back and forth) would have been to gut that map paper behind the red cardstock - too goot to keep such a large piece covered up!
Super page - and I love the thought that LM would have benn charging around just seconds later!
Lovely LO and such a cute photo, thanks for sharing all the photos. I quite often take a photo when I've got everything in the right place before moving everything to stick the individual bits down otherwise I never get it back how I want it!
I love the sentiment you put on it. Very nice.
What a beautiful page! I love this collection, too!
Fascinating to see your creative process :) I love to watch other people scrap - it gives such an insight into how they work! This came together beautifully :)
Like the idea of using stripey paper for journalling, will have to try that.
you are good marking out your layout - i just hope for the best!! Good to see your process x
My process is very similar. I tend to spend lots of time deciding what to do before I stick anything down! And I definitely don't measure things.
Rinda
I like the way you have built the layers up in this page
That's a lovely layout!
thank you for sharing your scrapping proces step by step I find it useful to see/hear what others do at each stage. Fantastic finished page love the story
This is a great way to do a layout. I've never done scrapbooking, but this method can eaisily translate to cardmaking.
To make my stickers less sticky I place and peel it a couple of times off my wrist. The oils in your skin will make it less tacky. Just test it after each 'peeling' to see if it's less tacky.
I always like to see other peoples' process in creating layouts and I really enjoyed that you shared all the photos too!
I always love to see someone else's process, whether it's in video or photos like you've done. The kraft mat makes all the difference to keeping the photo the focus.
I love the way you've used that tricky North Pole paper. I got some in the kit from Shimelle and fell in love with it but had no idea how to use it! Thanks for the inspiration.
This is one of my favorites from the weekend. Thanks for the explanation of how it all went together. I love the way you included the journaling.
Thanks for sharing your process, it's always great to see how other people work to see if it helps with my own. I love that background paper, it's gorgeous
Post a Comment