Friday 10 May 2013

Blog Event at my new blog!

Hello everyone, 

Just in case anyone is still following this blog instead of my new one, I'm here to let you know you're missing out! My latest blog event, Onwards and Upwards, has just begun!


Come to my new blog, Jennifer Grace Creates, to check it out! 

There's scrapbooking, cardmaking, tutorials, challenges, a blog hop, and lots and lots of giveaways! 

Jennifer x

Sunday 31 March 2013

Farewell Old Blog, Hello New Blog!

Edited to add: IF YOU ARE LOOKING FOR POSTS BY ME (Jennifer Grace), PLEASE VISIT MY NEW BLOG RIGHT HERE!

Hello, and Happy Easter! My first post has just gone live HERE at my new blog Jennifer Grace Creates. From now on I will be blogging from there instead of here - so make sure you go and check it out, and add the new address to your chosen reader. There's a giveaway there to tempt you over!

As a farewell to this blog, Jennifer's Jumbles, I thought I'd mention some of my favourite posts from here...

2010 was the year I really got into blogging, and this card was from April 2010. The flower on the front is actually a brooch, and my friend still wears it, which reminds me that I loved the project, and I always meant to make a brooch for myself too:

Flower Brooch Card:


I posted some photos from a childhood holiday saying that I should scrapbook them, but I still haven't got round to it. I really want to start an album about my childhood!


In September 2010 I started my first Learn Something New Everyday album, which I loved making, and we had a fun day out at a local village.


I made this hot air balloon as part of a blog hop, but I still like it hanging in my house - a lot of other home decor items I've made disappeared into a box soon after, but this one is still going strong.


One of my most viewed posts ever is this one about some gift bags I made for the guests of my friend's Hen Party. I still think the theme and items were perfect for her and the guests!


When I wrote this post I was feeling blue because I'd entered some layouts into a competition and not got anywhere. But this post led to me being invited to write for another magazine, which in turn has opened other doors, so I'm very thankful for it now. Plus I love my 3D layout about our family trip to London, which was a brilliant holiday!


I haven't joined in with Sian's Storytelling Sunday recently, but I love the posts I've written when I have participated. This one is one of my favourites, as it has the story of when me and my husband met.


You have to pay for most effects at PicMonkey now, but it's not very much, and you can opt out at any time, so I still use it and love it! This post has a few tips on how I use it to edit my photos. My daughter still loves to play on it to, she offered to teach my friend how to use it recently!


I could choose many, many more posts to mention, but those are my picks for now.

Thank you so much to everyone who has read this post, whether you are a long-time reader or if you've only recently discovered this blog! I really hope you'll join me over at Jennifer Grace Creates.

Bye for now! x 

Thursday 28 March 2013

March Counterfeit Kit Projects

My March Counterfeit Kit has been languishing in it's box all month long. Not because I didn't like it - in fact I love it for it's bright happy colours, and my handmade embellishments! But March has been busy with illness and birthdays, and I had other crafty projects to make for deadlines, so my poor kit was feeling neglected.

Not anymore though! Over the last couple of days I've made a layout and a couple of cards, and I'm working on some more. So though it's taken me a while to get to it, I know I'm going to get a lot of use from it eventually!

Here's the layout - Moments:


I chose soft colours for this page about my Dad walking me down the aisle on my wedding day. I like the coral colour in the patterned papers - it's not quite so girly as pink but still has a romantic feel. 

I used the Pink Paislee 'moments' word for my title, though I still haven't completely decided whether to put another word before this so it says 'nervous moments' or 'sweet moments' or something like that - what do you think? I couldn't choose what other word to use as their were so many emotions going through me at the time!


There's a cluster of embellies below my journaling - I used the key to symbolise that my future was becoming 'unlocked', my fimo feather was the perfect colour, and I love the heart button which is pale but pearly. I stuck these all on with glossy accents:


I'm happy with the dreamy feel to the page!

Here are the cards I've finished so far...

Believe You're Awesome:


A pretty card to cheer up a friend. I heat embossed a chipboard butterfly with white embossing powder - thanks Sarah for lending it to me! And I added some little pink gems to the wings, so it looks nice and sparkly.

For You: 


I just had to use this cute owl on something! This card would make me smile so much if it came through my door - I just adore cute owl designs. Plus the yellow is so cheerful. I can't wait to send it out to someone! 

Can you see the little heart stamp? It's from the Maya Road 'You Are' Stamp set in my kit - I used it on my layout too. I am going to be using this heart all over the place - it stamps so clearly and is a sweet finishing touch!

Have you been making any projects that make you feel happy lately? x

Tuesday 26 March 2013

Glitz Design & Gossamer Blue Contest ~ a Layout and a Card

Seeing as I've been telling you how much I'm loving Glitz Design, first in my CHA product picks post, and then with this Mother's Day card, and this 'Go' layout, among others, then you probably aren't surprised that I'm entering the Glitz Design and Gossamer Blue 'Guest Designer' Contest!

I've made two entries, a layout and a card. The layout is bright and summery - I feel like I need to scrap photos like this at the moment to remind me that the weather will heat up at some point (it will, won't it?!). I've used mainly the Color Me Happy collection as it's so cheerful...

Live for Adventure:


For the photo panel I cut a rectangle through the 'Woodgrain' paper, to turn it into a frame. The whole woodgrain sheet is adhered with 3D foam tape to enhance the frame effect. I built the background using a 12x12 sheet of white cardstock, which is then collaged with scraps of paper from the Color Me Happy 6x6 pad (and one from Uncharted Waters). I like how they disappear beneath the frame:


At the base of the photo panel I border punched some stars using an American Crafts Knock Out Border Punch. I left the cardstock to show beneath them so they stood out more.

I sprinkled some white mist drops around the title, and heat embossed the 'Chevrons' Roller Doodle pointing towards it, so it didn't get lost with all the bright colours above it. I also added the 'follow your dreams' giant rhinestone as a subtitle, I adore the multi-coloured letters in it:


It makes me feel warmer and brighter just looking at this page!

Here's the card I made as a second entry, a birthday card for my Dad. He loves the seaside, so the Uncharted Waters collection was perfect to send him some wishes...

Birthday Wishes:


Here's how to make the card:

1. Roll Glitz's 'Woodgrain' Roller Doodle in parallel lines over a 5½" square of dark kraft, using a dark brown ink pad. Then trim this kraft square down to 4¾" square, to cut off the imperfect edges.
2. Trim some yellow, chalkboard effect, and blue diamond patterned papers from the Uncharted Waters 6x6 pad down to 4¼" wide. My blue piece is 1" tall, the chalkboard piece is just over ¼" tall, and the yellow piece just over 3⅜" tall. Adhere all these to the centre of your stamped kraft square.
3. Machine stitch around the edge of these coloured papers, using off-white thread. Adhere the kraft square to a cream 5x5" card blank.
4. Add an anchor from the Uncharted Waters 'What-Nots' using 3D foam dots. Stick a giant rhinestone to the top of the anchor. Add the recipients name in the top right corner of the card using mini-alphas (Cashmere Dame) and dot four blue rhinestones around the anchor.
5. Heat emboss your sentiment onto cream cardstock, I used brown ink and clear embossing powder. Ink the edges of the sentiment's rectangle, and adhere on top of your anchor.

Then give to someone sea-worthy! 

Have my projects made you feel summery or sea-sidey today? Are you desperate for warmer weather like me?

Wish me luck in the contest!

x

Sunday 24 March 2013

Go ~ Glitz Layout

Hello! 

This is one of the layouts I made during the Crafty Blogger's retreat. It uses some of my most favourite products at the moment (I'm loving Glitz Design!), including lots of Uncharted Waters, and the fun Roller Doodle Anchor stamp which I had tons of fun with, to make my background:


The cardstock is American Crafts 'Robin's Egg'. I heat embossed the stamp in gold, and also stamped with dark grey and tone-on-tone turquoise inks. I let it stamp a little wobbly and allowed it to fade in places, so it has the effect of gently lapping waves. 

I also used the straw of a Mister Huey's 'Calico White' Mist bottle to streak some lines around the edges of the layout, and splattered some 'Gold Lame' Heidi Swapp Color Shine Mist all over the background for some 'sand'!

I used a title sticker to continue the 'Go' title - the sticker says 'your journey has moulded you for the greater good' (I covered up the rest of the sentiment):


The card I used to journal on is from the Whatnots. My journaling reads: 'The beach is the best! Stones and shells to try and eat, buckets of water to throw at Mummy, sand to rub into your hair! Fun!'

The journal card beneath this, from Uncharted Waters 'Bits and Pieces' has some glitter added thanks to Lizzie lending me her Turquoise Stickles (I have to get a pot of this for myself), it looks so shimmery, especially layered on top of a strip of American Crafts Gold Glitter Tape. I love how these remind me of the shine on the water and sand that day:


I also borrowed a Martha Stewart 'Punch all over the page - Pinking Circle' Punch from Louise to make the perfect sunny spot for a Glitz Giant Rhinestone:


I love being at a retreat and being able to borrow things off people for the perfect finishing touches to a project! Of course, it did just make me want to buy them all for myself too!

Have you made any of your own backgrounds or added lots of shimmer to anything lately? Leave a link if so, and I can take a look! 

I'm also entering this layout in the February Layout Love Linky at Purple Mail Box, a sharing linky for scrapbookers! x

Wednesday 20 March 2013

Lucky Charm Layouts & Giveaway Winners

Hello all. Sorry I've been absent for a week, we've all been a bit ill here. Nothing serious, but enough to make me feel a bit grumpy and run down. It was my daughter's birthday yesterday so any spare energy was put into preparations for that instead of blogging. She had a fabulous day and got lots of lovely presents, so she's happy!

In the meantime, some projects I made for the SJ Crafts blog were posted HERE yesterday. Sarah sent me a Dear Lizzy Lucky Charm 6x6 pad and Stamp Set to play with, and I have enjoyed using them so much! Here's the two layouts I made:

Love on Paper:


The feathers are cut from the 6x6 pad using my Cricut Mini and the 'Southwest' Cartridge, I thought they looked like writing quills so they worked well on a page about me and my husband signing the marriage register, and it gave some of my favourite papers from the pad a great place to shine!

I enhanced the romantic theme with gold heat embossed hearts on the background, and some envelopes and a jar fussy cut from other papers in the pad. The 'come fly away with me' sentiment on the hot air balloon stamp is just so dreamy, I had to use it on here too!

Disney Family:


I wanted a more bold and straight look for this layout, to contrast with all the details on our costumes in the photo. I love that this pad has gorgeous graphic papers as well as romantic ones - just look at these stripes, anchors, triangles and chevrons - it's so trendy!

I stamped and heat embossed the chevron stamp several times on the left to point at the photo, and I added this 'you make my heart sing' cut-out from the pad, as my family make me so happy! The heart gems on here are by Papermania, and there's some enamel dots (My Mind's Eye My Girl), and some clear gemstones (Hero Arts) - which I've used as raindrops from the cloud. I've used this technique before (here), but I thought it was okay to do it again as I loved it and the layouts will go in different albums!

If you want to see some close-up details of the layouts, then go HERE to the SJ Crafts blog to take a peek! I made a couple of cards with the collection too which will appear over there soon!

Giveaway Winners: 

Before I go, I have a couple of Giveaway Winners to announce... these are both re-draws because the original winners never contacted me.

The first is a new winner from the PaperHaus Spring Fling Blog Hop Giveaway...


Congratulations dogmatix, please contact me at jennifergrace (at) hotmail (dot) co (dot) uk with your mailing address and I shall send the roller doodle and bits to you!

The next is a winner from a rather old giveaway... sorry it's taken me so long to re-draw this... it's from my Frosty Festivities event back in November! There's a new winner for the SJ Crafts Sponsored Giveaway:


Congratulations Becky, please let me know your mailing address (at same email as above) and we shall get the Echo Park 'Photo Freedom' kit on it's way to you!

Have you been feeling lucky lately? I hope so!

x

Wednesday 13 March 2013

Sibling Joy ~ and disagreements!

Apparently I'm super inspired by challenges right now. And who could fail to be inspired by the Gossamer Blue and Elle's Studio challenge HERE! There's so many gorgeous layouts with scraplifting potential to choose from, and a very nice looking prize to tempt me to enter!

Here's my layout for the challenge:

Sibling Joy:


I scraplifted 'Beach Love' by Christa Paustenbaugh. I love how she'd stitched through part of her title, and I like the punched border with tags tucked into it, so I couldn't resist lifting these details from her!


 My tags tucked behind the punched border are all different shapes and sizes. The star flag is a stamp from the Be Merry Christmas stamp set, and the bottom pink banner is actually a bit of tidbits packaging cut to shape! 

My tags are also special because if you give them a tug, a journaling card slides out from beneath the punched borders... 

Do you remember a little while ago, when I said I ought to document the fights my kids have, as well as the special moments? This journaling does just that, listing some of their most recurring disagreements of the moment!


I hope in years to come it will be fun to look back at the silly arguments they had!

At least the playpark usually keeps them happy - in this photo my daughter was helping cheeky boy down the slide - she's very sweet to him really, and I know they love each other a whole lot.


The 'love you' and 'way to go' tags are from the 'Everyday Greetings' printable sheet, which I had forgotten I had, and now will be sneaking onto all kinds of projects!

Have you scraplifted anyone lately? It's a great way to get some inspiration for a few details here and there! x

Tuesday 12 March 2013

Bomb Diggity ~ Mama Elephant Sketch Layout

Have you heard of Mama Elephant stamps? I've been drooling over them for a little while, and they are high on my list of things to buy - especially the Modern Borders and the So Breezy sets from their last release. 

At the moment they are running a sketch challenge, right HERE. They kindly provided some fun free digital stamps, so that anyone who hadn't had a chance to buy their stamps could join in too - isn't that lovely of them? 

I hope they don't think I'm breaking out of the box too much, as most of the challenge entries are cards... but I just had to print the digi stamp out to use on this layout!

You're the Bomb Diggity: 


Both the 'you're the bomb diggity' and the 'celebrate love everyday' banners are from the free digi stamp set. Unfortunately my colour ink is running out so the pink one printed a little stripy, but I decided to embrace it as the page was quirky anyway!

Here's the sketch for the challenge (it closes on 14th March, so there's still a little time if you want to enter):


I flipped the sketch, and the 'sentiment' became my title. I followed the sketch by framing my white cardstock with grey, overlapping two banners, and adding a little lacy detail beneath them:


I just love how the title is a bit tongue-in-cheek silly - it suits the photo, no?! I'm on the right in the photo, in case you were wondering if that really was me, thanks to the crazy face! My sister is in the middle, and my sister-in-law is on the left - I should say 'sorry girls' to be posting this out there for the world to see!

 The journaling reads:

'Who would guess we were at an elegant dinner dance in fancy dresses?! I had such a fun evening having a few drinks with my sister and sister-in-law, dancing the night away, giggling, and being silly! We know we're cool...'


I don't like too much white space, so I did a little splattering and scattered some Studio Calico Tiny Stars, as well as heat embossing a Lucky Charm stamp with black glittery powder, to give the background lots of interest.

I'm super happy with how the layout reflects the vibe of the evening - a bit glam and girly, but also tons of fun! Hand's up anyone else who's pulled silly faces with their girlies for the most flattering photo ever?!

Ha ha! Have a great day, x

Monday 11 March 2013

Crafty Bloggers Unite!

On Friday 1st to Sunday 3rd March I went away for a crafty crop - my first crop ever! The room was filled with the nicest bunch of ladies you could hope to meet... in no particular order they were Lizzie, Alexa, K, Missus Wookie, Julie, Sandie, Jill, Jemma, Louise, Jacky, Fay, Kirsty, Alison, Ruth, Mel, and Me!


We'd hired out a Youth Hostel all to ourselves for the weekend, so we could make a nice mess of the long table... you can see a plate of homemade biscuits I took with me to share: 


Our evening meals were cooked by the YHA staff, but we'd all taken food towards lunch and breakfasts... and we had tons! Here's just a small amount of it:


There was plenty left for a midnight snack with a glass of red wine, while I played with a Dear Lizzy Lucky Charm Stamp and some embossing powders that K lent to me:


One of my favourite items I made that weekend was a long-stitch handmade book. Lizzie taught a workshop on how to make one and I used some vintage fabric lined with scrapbook cardstock for my cover, and sketch paper for the pages:


I also managed a few layouts, a couple of cards, a fabric yo-yo, and 3 mini-books! They weren't all finished by the end of the weekend, but I've been finishing up since I got home. You already saw one of them - my Counterfeit Kit layout for challenge 2. The rest will appear here over the next week-or-so!

Thanks very much to all the lovely ladies that I spent the weekend with. It was wonderful to meet so many people whose blogs I have read for a while, and cool to meet Louise and Jemma that I'm on Design Teams with! Special thanks to Fay, Lizzie, and Mel, who were sitting nearest to me when I arrived rather late on the Friday night (I got stuck in horrible traffic on the way there) - they chatted to me lots, making feel at home straight away!

I can't wait to see everyone again at the next one! x

Sunday 10 March 2013

Happy Mother's Day + Washi Tape Bow Tutorial

 Today is Mother's Day here, so Happy Mother's day to any Mother's / Grandmothers / Carers out there!

I had pancakes for breakfast in bed this morning (see my Instagram photos in my right sidebar for pictures!), so that was lovely. Unfortunately hubby then had to dash off to work, but my friend Rosie is cooking a roast for me and my kiddies for lunch - isn't she lovely?!

Here's the Mother's Day card I sent to my Mum. I won't see her today as she lives too far away for a day trip, but I should be seeing her in a week or so. I hope this colourful card made her smile this morning:


I used mainly Glitz Design items, from the 'Color Me Happy' and 'Uncharted Waters' collections. I love the giant rhinestone with a heart inside, and I'm having so much fun with the roller doodle stamps - I used the chevron doodle, with gold glitter Zing embossing powder, down the right of the card. It adds a lovely sparkle!

Do you want to know how I made the washi tape bow? Here you go:

Step 1: Cut a section off a cardboard tube, to just below the width of your washi tape:


Step 2: Cover it inside and out with washi tape (two different kinds of tape):


Step 3: Poke a hole through the middle of the front and back of the tube, and push a brad through to hold the tube together in a bow shape. The washi will wrinkle around the brad, but that's okay as you are going to cover up this centre section:


Step 4: Wrap some washi tape around the centre section a couple of times to cover up the brad and the wrinkled tape:


That's it! If you want the bow to have tails then just cut these from the same washi tape and stick them onto your project before you add the bow. Make sure you use really strong adhesive to attach the bow - I used a hot glue gun, but glossy accents or similar should also work.

This bow does make the card a bit bulky, as it doesn't squish down like a ribbon bow would. I had to send my card 'large letter' size by Royal Mail. I don't mind this, but if you don't like paying more for postage then you should save this kind of bow for hand-delivered cards or other projects!

Whether you are a Mother or not, I hope you enjoy your Sunday! x

Saturday 9 March 2013

PaperHaus Hop Giveaway winner!

Hello everyone! This is my second post today - for my Counterfeit Kit Challenge Layout see HERE!

I have a winner to announce today, from the PaperHaus Spring Fling Blog Hop:


Congratulations isa@scrapdisa, please contact me at jennifergrace (at) hotmail (dot) co (dot) uk within 7 days with your mailing address so I can post your Glitz Roller Doodle and other bits on their way to you!

Thanks to everyone who entered. And if you didn't win, then there's still time to enter this other giveaway, by completing a survey for me! Bye for now, x

Counterfeit Kit March Challenge #2

The Counterfeit Kit March Challenge #2 is to mix at least 3 different patterned papers together, inspired by the designer Vera Bradley. I often mix patterns together on pages with a cardstock or plain background, so to really challenge myself I used a background paper with a bold pink chevron pattern...

Happy to be Together:


I made sure that some patterns were bold, some subtle, some big, and some small, so that the patterns didn't overwhelm my photo. 

I am pleased to have finally used this 'Happy to be Together' chipboard piece as my title - it's been in my stash for years and years:


And my Shrinkles bird looks good next to some layered up Prima flowers and Crate Paper Brad (I attached the bird using glossy accents):


I love how bright and busy this layout is, as it reminds me of that summer day. Though since I finished and photographed the layout I've remembered more details about the day - like how me and my daughter didn't like the food as she is picky and I was heavily pregnant... and how she didn't want to go home because there was a path-maze that she was walking round-and-round for ages... I need to fit some more journaling somewhere!

How about it - will you have a go at mixing lots of patterns on your next page? 

I'm off shoe shopping for the kids today... wish me luck! x

Thursday 7 March 2013

Picture Props Layout

I created this layout for a Crate Paper challenge called 'Love Red'. My page was featured as a runner-up on their round-up post HERE

The colour red has been sneaking back into scrapbook collections more and more, and I love how it really stands out on my projects!

Picture Props: 

Picture Props - a Crate Paper Layout by Jennifer Grace

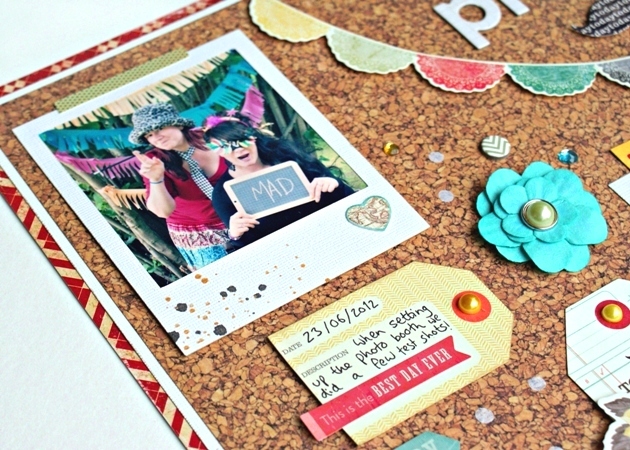
I used the cork-board Storyteller 'Archives' paper as the background, so that the photos and items look like an eclectic mix of bits and pieces, all pinned together. I framed the cork-board paper by layering it onto white cardstock, and then onto some red & cream patterned paper (Fourteen 'Connection) - this defines the edge of my page, but because the red is patterned it doesn't dominate the rest of the layout.

I had fun using some doily bunting, and a moustache, from the DIY Shop collection pack, to make a focal area for my title:


You can just about see in the next picture that I stuck the photos and tags down flat at one end - the end they were 'pinned' or 'taped' at, and then used 3D foam dots at the opposite end, to enhance the effect that they'd been quickly attached to a cork-board:


I made the polaroid frames myself from white cardstock, adding some gold and grey mist droplets at one bottom corner, and a heart snipped from the Fourteen tag-cuts sheet at the other corner:


You can also just about see some white crepe paper dots. I'm using crepe paper on all my layouts about my 30th Birthday, to bring them all together. I just punched these ones with an ordinary hole punch - they add a subtle detail to the background.

I love this page because the whole feel of it reminds me of the crazy fun me and my sister were having, grabbing random bits and putting them together for a silly costume photo! And the bold touches of red are perfect. Have you used the colour red on any projects lately?

Bye for now, x

Related Posts Plugin for WordPress, Blogger...