Thursday, 31 May 2012

May in Numbers

It's time again to wrap up the month, using numbers to tell our tales. To find out more about this blogging pastime, check out Julie Kirk's information about it here, or her post for this month here

My May in numbers:

The 5th of May was (Inter)National Scrapbooking Day. I really enjoyed visiting blog hops and joining in with chats and challenges! I showed you one of the challenge entries I made here, and I have another to show you at some point, when I remember to re-photograph it - the photo I have is too blurry.

2.20 hrs - The amount of time it took to change my hair from this:


To this:


My sister dyed it for me (she's a hairdresser). It had to be bleached first to get a nice, bright red colour. I'm turning Thirty in June and I've always wanted red hair, so I decided to go for it! I doubt I'll be able to maintain it for long though.

£39 for a room in a Premier Inn hotel, for a night away to celebrate our Anniversary. My lovely mum looked after the kids for the night, so we could go to Reading, and watch my friend's band Beartown Zodiac, play a gig:


145 game pieces in total, in these board games that we bought whilst visiting my Nan and Grampa. We were there for two days, and the weather was horrible, so there wasn't much to do except stay in and play games, and we'd exhausted Skipbo. These new ones from the second hand shop kept my daughter amused for ages:


2 trips to the cinema. I hardly ever go to the cinema these days, so twice in one month seems exotic! I saw The Lucky One with my husband, and The Hunger Games with my friend, and both were very good:


pg 26, the page number of my project in the latest Popular Crafts magazine:


I was also excited to have a card featured on Scrapbook & Cards Today Magazine blog here, with 5 others, when they asked to see Mother's Day cards. I was especially excited because mine was at the top, which was probably just good luck, but it meant that my card showed up as the thumbnail for the blog post link on facebook etc. Yay!

15,302 (estimated) grains of sand brought home in total from a few trips to the beach. I don't know how we managed to bring so much sand back each time. We put it all into the sandpit though, and then it gets stuck in the bottom of my daughter's buckets, and we take it back to the beach next time. So it's all part of the circle of beach visits:


And this photo brings me nicely onto the next number - unusual things my son has attempted to eat this month = 8 - sand, stones, shells, cat food (when visiting a friend), flowers, leaves, twigs, and grass:


All while his sister runs round him, with both of them wearing a thick layer of factor 50 sunscreen in this lovely hot weather:


Though to be honest, I'm glad it's now starting to cool down, as baby has not been sleeping well in the heat!

So there we go, my busy month. I haven't even mentioned the lovely time spent with my family in Kent, when we visited Folkestone, went to the playpark, and ate fish and chips. Or the night when I went round a friend's for the evening, for a girly gossip and wine night. It's been a good month!

Now I can look forward to my birthday, and a blog event happening right here at the end of June - to be announced tomorrow! x

Wednesday, 30 May 2012

Recipe - Pork and Apple Burgers

It's been a long time since I posted a recipe on here, and I don't really know why, as I love to cook, and I like to try and make up healthy, tasty meals for my family. I think perhaps I'm intimidated by the wonderful, detailed food I see some people blog about, where as my meals are just simple - but good - grub!

This one is a favourite in our household, especially when the weather is hot like it has been lately. The whole family can eat these juicy burgers - baby (10 months +) too!


Pork and Apple Burgers
(prep time 10 minutes (plus 30 mins chilling), cooking time 15 minutes)

You will need (makes 6 burgers):

500g Pork Mince
1 Dessert Apple (I used Gala this time)
1 Medium Egg
1 Tbsp Dried Sage
⅛ Tsp each of Salt and Pepper (leave these out if cooking for a baby or toddler)

To cook :

  • Take the pork mince and the egg out of the fridge (if that's where you keep your eggs) and wait 5 minutes, so they're not as cold when you are mixing.
  • Peel and grate the dessert apple, and squeeze the excess juice out using a paper towel. If the apple is too juicy the burgers don't bind as well.
  • Place all the ingredients into a large mixing bowl, and knead them all together with your hands, until well combined, and all sticking together.
  • Break the mixture into 6 equal portions, and shape each one in your hands to form a patty. Place them on a plate, cover with cling film, and put in fridge for 30 minutes.
  • Heat a griddle pan to a medium-high heat, spritz with spray oil, and cook burgers for approx 15 minutes, turning a few times. The burgers are ready when the outsides are golden brown, and the juices run clear. Try not to overcook as they aren't as juicy if they are cooked too much. (You could also cook under a grill, or on the barbeque!)
  • Serve on a bap with an apple chutney and some cheddar cheese. For lunch serve with a salad, for an evening meal add some potato wedges. 
  • For a baby (I've said 10 months + as my 10 month old enjoys these, but be aware I'm not a baby food expert, and remember to never leave a baby unattended whilst eating!) serve half a burger cut into chip-sized chunks, with peeled and steamed sticks of carrot and pepper:


These burgers taste so much nicer than any shop-bought ones that I've ever tried! 

I'm linking this post up with:


So what do you think - should I share more recipes on here? x

Monday, 28 May 2012

Fairy Belle Layouts

I have two layouts to show you today, made with Prima Fairy Belle. The collection was sent to me by the lovely Sarah at SJ Crafts, and it's in stock HERE if you'd like to get hold of some!

The first layout is one of my favourites lately, and it was partly scraplifted from this layout by Stacey Cohen, which I talked about wanting to scraplift in this post. I had to create something cute and lovely to match the sweet photo of my two kids touching noses:

Supplies= Bazzill Basics Cardstock; Prima Fairy Belle 6x6 Papers, Alphas, and Flowers; Sassafrass and American Crafts Alphas; Cosmo Cricket Tiny Type 'Typewriter' Stickers; Papermania Brads; My Mind's Eye Twine; Slice Design Cutter with Basic Elements and Noteworthy Design Cards; White Acrylic Paint; Brown Thread; Black Gel Pen; Brown Ink Pad; 3D Foam Dots and Tape.

I scraped some white paint (using an old credit card) over the light blue background to create a dreamy feel, which I really like for this page.

The Cosmo Cricket Typewriter words add nice sentiment details:


I had fun cutting the tags using my Slice, and I mounted them on the layout with 3D foam tape to give a bit of dimension:


I was pleased that the page doesn't look too girly - despite the collection being called 'Fairy Belle', it has worked quite well to make a layout that suits my little boy and my little girl.

But then, of course, I wanted to make a super girly page with the collection for my daughter:

Supplies= Bazzill Basics Cardstock; Prima Fairy Belle 6x6 Papers, Alphas, Chipboards, and Flowers; White Acrylic Paint; White and Black Gel Pens; Cosmo Cricket Tiny Type Typewriter Stickers; Slice Design Cutter and Noteworthy Design Card; a Pearl, and a Gem; 3D Foam Tape. 

My friend bought this ballet outfit for my daughter, and she loves dancing around in it. As soon as I saw the pretty chipboards in the Fairy Belle collection, I knew I wanted to showcase lots of them together on one page. I've seen some brilliant picture gallery style projects online lately, like this layout or this wall art, so I tried to replicate that feel.

I used an old credit card again to apply the paint, this time just using the longer edge of the card to keep the line thin, but I also let it get a bit 'messy' looking, to stop the page looking too sharp. 

I also added a small photo of the ballet slippers to a circular detail on one of the chipboard pieces:


And again I used the Cosmo Cricket Typewriter stickers to add a little sentiment:


I made a card with the collection too, which you can see, along with a couple of different detail shots of these layouts, on the SJ Crafts blog here


I love how the collection works well on both blue or pink (and probably many other colours too!). What colour background would you use it on? x

Sunday, 27 May 2012

Giveaway Winner!

Well, there was a total of 224 entries for my Sew Mama Sew Giveaway of vintage fabrics. Thanks so much to all who entered! And hello, and thank you, to new followers, it's great to see you!

I read every comment, and I really enjoyed learning about all the crafts that people enjoy. Though I now want to try and convince all the non-scrapbookers how fantastic the hobby is! One thing that surprised me was a few people mentioning they don't have the patience for scrapbooking - this is how I usually feel about sewing. I guess it's all perspective!

So, I used Random.org to generate the winner:


And lucky commenter number 24 is:


Congratulations Marjorie, let me know your postal address and I'll get the prize sent off to you, I hope you enjoy it!

Thanks to Sew Mama Sew for hosting the giveaway. 

I'm off to the beach for the day with the kids, whilst hubby helps a friend to fit a new kitchen. I think he drew the short straw!

x

Wednesday, 23 May 2012

Cocktails at 1812 Layout

I have been using my May Counterfeit Kit, I promise! Here's a layout to prove it:


1812 is a brilliant cocktail bar in Bournemouth. We don't go there often, but I love it when we do, as the cocktails are made with fresh ingredients (and there's tons of choice), and there's often a great live band playing. It was really fun putting on our glad rags and having a dance. 

The only trouble was that the bar was very busy, so I didn't want to keep queuing for more drinks. Though this was probably a good thing for my wallet and my constitution!


Supplies include paper by Pink Paislee and a chipboard journaling spot by Crate Paper, which I've trimmed and distressed the edge of. The only thing I added in addition to my kit was a few gems.

I've noticed that one of the challenges this month at the Counterfeit Kit Challenge Blog is to use fabric on a project, so I'm going to give that a go! I've got a giveaway running at the moment, for some vintage fabric strips that would be great for adding details to layouts or cards, check it out here.

What's your favourite cocktail?

x

Monday, 21 May 2012

NOW CLOSED! Sew Mama Sew Giveaway!

Giveaway now closed - thanks to all entrants! The winner has been announced on another post, which can be found here.

Hello to any new readers, as well as my lovely regulars!

Today I'm joining in with the Sew Mama Sew biannual Giveaway, which will include hundreds of sewing & craft supplies or handmade items up for grabs (see here to check out the rest!). I've read other blogs taking part on previous occasions, but this is the first time I'm joining in with a Giveaway of my own.


I'll fully admit that I'm more of a scrapbooker than a sewer these days, and that my sewing machine gets used more on paper than on fabric, but now and then I make a stitched project. And I still have lots of lovely materials stored from the days when I did more sewing, including the vintage fabrics included in the Giveaway.

My Mother used to use these fabrics to make quilted items when I was just a bouncing baby, and she gave me the left over pieces when she bought me a sewing machine for my 21st birthday. But that was 9 years ago, and I still have lots left, so here's a chance for you to win some:


One winner will receive a Mini Jelly-Roll of vintage fabric strips, and five ⅞" fabric-covered buttons. PLEASE NOTE this is a Mini Jelly-Roll, not the 'standard' size. There are 20 fabrics strips included, 2 each of 10 coordinating patterns. Each strip measures at least 3" x 20". Some of the strips are slightly taller or wider, but they are all at least this size. And they have all been cut with pinking shears, by my Mother's fair hand over 25 years ago (they've been stored carefully!).

Though the strips are smaller than the standard Jelly-Roll size, there's still plenty you can do with them! This post at Tipnut has lots of great ideas for smaller projects, and it's where I found this link at Frame Worthy Shot to make a bracelet, which I've made with one of the same strips of fabric:


So there's one idea for the winner! I'll even include a length of 1" wide elastic in case the winner wants to make a bangle of their own straight away.

To enter the giveaway just leave a comment on this post - you can just say 'Hi' but I'd also love to know - are you someone who scrapbooks as well as sews, or sews as well as scrapbooking?

The giveaway is open until May 25th at 5pm PST, so please comment before this time. I will post the prize to anywhere in the world. And make sure you leave a way for me to contact you, if you're not easily reached via a Google profile, in case you win and I need to let you know!

The winner will be chosen at random from all comments, and will be posted here by Sunday 27th May.

Thanks so much for visiting, I hope you have a great day! x

Friday, 18 May 2012

SJ Crafts Challenge #5

It's time for a new challenge at SJ Crafts, and this month the theme is 'All About The Boy', with an added extra to use up something that's been in you stash for a while! You can see the challenge here, to take a look at the other DT examples, and to enter if you like - the deadline is the 20th of June.

Here's my page, 'Dinosaur Roar':

 
Supplies: Bazzill Basics Kraft Cardstock, Basic Grey Archaic Papers, Prima Fairy Belle 6x6 Papers, Alphas, and Chipboard, Prima E Yellow/Orange Pearls and Crystals, Papermania Gunmetal Pearls, brown thread, 3D foam dots, black gel pen.

It was easy to think of an old item from my stash to use, as I've had these Archaic papers for years - waiting for me to have a baby boy, to dress in a dinosaur costume. If I hadn't had my own I'd eventually have borrowed an unsuspecting friend's baby, just to dress up for a photo shoot :-)


I'm sure I could have used the papers on a different layout really, but I kept ignoring them in my stash because they were quite detailed and I find that harder to work with. But for such a cute photo I pushed myself to overcome this - and did so by cutting a wavy strip from one paper to layer behind the photo, and fussy-cutting circles from the same paper, and dinosaurs from the other, to scatter around the page. With a few pearls added too for a little extra shine! 


What items do you have hanging around in your stash? Are they waiting for the perfect photo, or are you not sure how to use them? 

x

Monday, 14 May 2012

'You & Me' Layout

As previously mentioned in my Storytelling Sunday post, it's my husband and I's 4th anniversary this month. So when I saw the current challenge at the My Mind's Eye blog, to use brads in an inventive way, I thought I should scrapbook a photo from my selection of wedding photos, that are part of my my ever growing 'to scrap' pile.

I used my brads to make a jewel-encrusted heart, and to tie a twine line along the base of my layout to make the title stand out:

Supplies: Bazzill Basics 'Carob' Cardstock, My Mind's Eye Stella & Rose Hattie 'Boy' Tapestry Paper, Gertie Title,  Lost & Found 2 Rosy and Miss Caroline Dolled Up Brads, Kraft Funday Twine, Rosy 6x6 Papers, 3D Foam Tape, Silver and Gold Glitter, Black Gel Pen, Hole Punch, Gold Acrylic Paint, PVA Glue.


To make the heart I cut a 3 inch cardstock heart using my Slice cutter:


I stuck 3D foam tape along it, with 3 layers of tape in the centre, 2 on the next line along, and 1 layer at the edge, to give the heart some shape:


I peeled off the top layer of the tape to reveal the sticky part, pierced holes, and attached brads all over the heart:


Once all the brads were attached I filled in the gaps with some loose silver and gold glitter. There were a couple of patches where the glitter hadn't stuck very well to the tape, so I dotted on a bit of Glossy Accents, and added some more glitter on top. And I decorated the edge of the heart by painting it with gold acrylic paint and sprinkling glitter on while the paint was still wet - acrylic paint is a good adhesive. 

The MME Rosy brads look gorgeous in their sparkly setting:


I also wanted to use confetti on this page, as it seems to be a bit of a trend at the moment, and it's very fitting for a wedding page! So, I layered some on top of these green sunburst style shapes - which were part of the 'You & Me' My Mind's Eye title that I cut up. 

I used a hole punch to make lots of confetti circles from MME Rosy paper, and stuck a couple of rows carefully on top of the sunburst shapes, to make sure the words were covered and the colours were spaced out:


And then I used PVA glue to heap a random selection of the confetti circles on top, and around the edge of the sunbursts:


I think the layout has got the romantic, happy feel that I was aiming for!

Have you thought about different ways of using brads on your layouts? Have you tried the confetti technique?

I'm to my Nanny's house for a couple of days now, so I'll see you again later in the week! x

Thursday, 10 May 2012

10 Things... Vintage Books

I'm joining in again with Shimelle's regular ritual to write about ten things, any ten things, on the tenth of the month. To join in, or to read 10 things from many more blogs, see Shimelle's post for today here.

This month I'm going to show you some of the vintage books that I've been hoarding. For a while I've been jealous of Julie Kirk's ability to cut up vintage books, and put the pieces together on her projects, or in her fantastic Plundered Pages packs. I've mentioned to her that she needs to run a course on how to be brave enough to cut up these books, because I have an ever-growing collection of ones that I've bought for projects.

Despite forcing myself to cut up a Ladybird book for my Learn Something New Everyday Album last year, and cutting up text for backgrounds and flowers for some Hen Party Gift Bag items, I still haven't managed to get a pair of scissors anywhere near the rest of my vintage books.

Here are my favourites:

1: Book Of Ryhmes Number 3:


Which has lovely, detailed illustrations like this one:


I want to put this one into two frames, one for each page, and hang them in our entry-way, above our wellington boots.


2: Telling The Time:


Very intro images inside this one:


I don't have any particular ideas for this image, except that I wish I could step into it and share their tea!

3: Sacred Songs & Solos:


This is a very thick volume, and I snapped it up for 20p at a car boot sale, because I thought it would be great to use the music pages as background papers. But then when I got home I couldn't decide whether it was 'right' to cut up a hymn book, what do you think?


Strangely, when I opened this to photograph the inside, it fell open on 'Amazing Grace' which we sung at my Granny's funeral in February. It made me think that somewhere she was smiling at me, possibly laughing at me for photographing a pile of old books :-)

4: Famous Fairy Tales:


Which includes some gorgeous full-page illustrations like this one:


Which I'd love to frame for my daughter's bedroom.

5: Time, Calendars and Clocks:


I bought this one for it's cool, steam-punk style illustrations:


I'd like to cut this page up for some altered art, though I'm not sure what exactly!

6: A Book of Modern Verse:


Bought mainly for the stunning yellow cover, which I'd like to use for a project like this one. The pages inside might come in handy too:


I'm sure I could cut some of the poetry up to use on layouts.

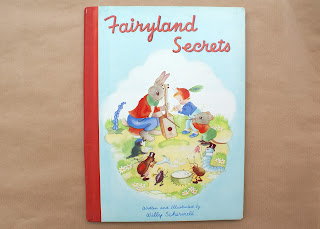
7: Fairyland Secrets:


Which has the most adorable pictures of bunnies, cute critters, and fairies:


I want to use this on an altered canvas, with flowers and glitter and beads all around it.

8: The Pocket Encyclopaedia of the World:


A neat little book with colour maps that would look good as background papers, or cut into tags or letters for scrapbook pages:


Something about this book stops me tearing it up, I think it's that I quite like its small size, when the other atlases I've seen or own are larger.

9: Play Street:


Look how cute the images are:


I'd like to use the best images to make mini-book covers for mini-albums for my kids. The rest would look good on cards.

10: Highroads of History:


Another one chosen mainly for the cover, the Celtic-style square would look great as a frame. But it also includes some nice colour illustrations like this:


Which I'm sure would come in handy for something!

So, what about you? Do you have any books you bought for crafting, but can't bear to cut up? Do you have any ideas for what I could use these covers or pages for? Do you have any suggestions for how I can get over my fear and set the scissors on them?

x

Related Posts Plugin for WordPress, Blogger...