
They are quite easy to make, look shop-bought, and are a great way to use up paper scraps! You can probably find other tutorials in blogland on how to make these, but I worked out how to do them myself so I thought I'd share my process here with you.
The first time I made these I drew the flowers free hand, but when I realised I'd be making more I created a template. If you want to use my template you can either save the photo below to your computer and stretch it to the size you want, or you can download the word document with the correct size flowers by clicking here.

Print and cut them out to use as templates. I stuck mine onto card (a bit that was the back of a pad of gummed paper!) and cut them out again so they were sturdier, and added a blob of blue tac to the back of each to make it easier to hold them:

Then you need to select three scraps of paper to use - make sure your scraps are big enough, I keep picking bits out, lining them up, and then finding the flowers don't fit!

Draw around the flowers on the backs of the paper scraps:

Cut them out and ink the edges (a dew drop / cats eye inkpad will come in really handy at this point!):

Then you need to curl the edges of the petals to give them some dimension. I find the best way to do this is by pinching them individually between my forefinger and thumb, below is a video of me doing this to the largest flower:
Once you've curled all the petals you can then attach a button to the smallest flower using glue dots, and layer the flowers up using 3D foam tape or dots on the back of the small and medium flowers:


You might need to curl the petals again slightly, then your flower is finished!:

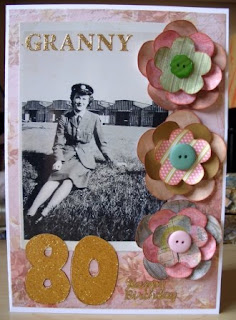
Now you can attach it to your project! I use glue dots to attach mine to my layouts or cards, but I'm going to try a few other ways to use them too (altered jars / picture frames / boxes - ooh the possibilities!). Please let me know if any of you are inspired to make some of these, I'd love to see your projects! For now I'll leave you with the card I've used this flower on (click photo to see it larger):

4 comments:
How cute are these!! Thats for the tutorial!
Those flowers are so pretty - I will have a go at this.. but I have some flower nestabilities so will try them first! Thanks for the lovely tutorial. Sx
Printing that template out as I type this! Thanks for sharing x
I love your flowers. Thanks so much for sharing this idea. I will be making these.
Post a Comment