Friday, 30 July 2010

Sketchy Thusdays Sketch 7.29

I love the Sketchy Thursdays sketch this week, especially Lisa's take on it, so I had to try it out straight away:


I like how it's quite simple, but can be adapted in so many different ways. I'm sure I'll be using this one again, and will always end up with something really different! Here's what I made of it this time (click on the photo to see it larger):


Journaling reads:

'My 24th birthday was spent on Koh Phi Phi in Thailand. We swam, sipped champagne and cocktails, sunbathed, ate good food, and watched Poi dancers. Perfect!'

Had lots of fun glimmer misting and distressing the light green cardstock, then fraying and machine stitching the faded brown paper. I also found some perfect bits in my stash to add to the page, inc a vintage image of a girl and a big b'day cake, and a postage stamp from thailand.


I have got so many travel photos waiting to be scrapbooked, it's nice to get one done every once in a while and remember what fun we had. I'd really like to go back to Phi Phi one day, I loved it there for the snorkelling, boat trips, and great places to hang out. Ah, one day I'll be there again! xx

Wednesday, 28 July 2010

explore magic ...

The Sketchy Thursday sketch this week was a bit unusual:


But I felt up for a challenge, so I gave it a go! I decided to do a collage layout as I haven't done one of these for a while, and I thought the wavy diagonal line would work well as a hillside. Trouble was, by the time I'd stuck on a castle and my photos, you can't really see the hilside any more! The sketch is still there, just a bit buried! (click on photo to see it larger):


I had fun cutting out the castle, as it's a very well known image around here - it's the symbol for the district council and it's on lots of bus stop signs, local produce packaging etc. I also painted and cut out the 'castle' lettering, as I didn't have anything left in my stash that worked:

My daughter absolutely loves going to the castle, and I posted a while back about this day when we went on a mummy-daughter adventure there (see the post here).

(Just had a 'how dumb am I?' moment - I searched the internet for ages earlier, to find a good photo of the castle to copy for my collage, and there was one I'd taken smack bang at the top of that post. Doh!)

Little miss has a bit of a cough and a runny nose at the moment, and she was feeling a bit sorry for herself this afternoon. We watched a couple of films: Peter Pan and Cinderella. All my disney videos are getting a bit worn out, The Little Mermaid tape squeaks while it plays! Think I'll have to invest in some dvd's!

xx

Tuesday, 27 July 2010

Paper flowers tutorial

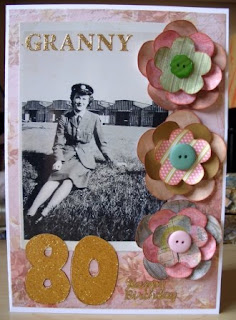
Well, I think I've sussed document sharing now, though it took me a few days to work it out! I've been waiting to show you how to make the paper flowers I made for my 'when I need to talk' layout (see post about it here), and I also used a few of them on this A5 card I made for my gran's 80th birthday last weekend (click on photo to see it larger):


They are quite easy to make, look shop-bought, and are a great way to use up paper scraps! You can probably find other tutorials in blogland on how to make these, but I worked out how to do them myself so I thought I'd share my process here with you.

The first time I made these I drew the flowers free hand, but when I realised I'd be making more I created a template. If you want to use my template you can either save the photo below to your computer and stretch it to the size you want, or you can download the word document with the correct size flowers by clicking here.


Print and cut them out to use as templates. I stuck mine onto card (a bit that was the back of a pad of gummed paper!) and cut them out again so they were sturdier, and added a blob of blue tac to the back of each to make it easier to hold them:


Then you need to select three scraps of paper to use - make sure your scraps are big enough, I keep picking bits out, lining them up, and then finding the flowers don't fit!


Draw around the flowers on the backs of the paper scraps:


Cut them out and ink the edges (a dew drop / cats eye inkpad will come in really handy at this point!):


Then you need to curl the edges of the petals to give them some dimension. I find the best way to do this is by pinching them individually between my forefinger and thumb, below is a video of me doing this to the largest flower:


Once you've curled all the petals you can then attach a button to the smallest flower using glue dots, and layer the flowers up using 3D foam tape or dots on the back of the small and medium flowers:


You might need to curl the petals again slightly, then your flower is finished!:


Now you can attach it to your project! I use glue dots to attach mine to my layouts or cards, but I'm going to try a few other ways to use them too (altered jars / picture frames / boxes - ooh the possibilities!). Please let me know if any of you are inspired to make some of these, I'd love to see your projects! For now I'll leave you with the card I've used this flower on (click photo to see it larger):

xxx

Monday, 26 July 2010

Giveaway winner!!

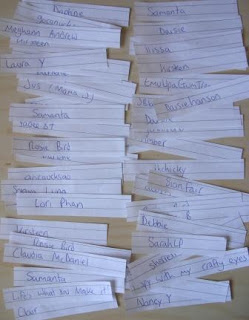
Thanks so much to everyone who entered my birthday giveaway! The draw has taken place. Here's the names all written out:


Folded and placed in a top hat:


And you can find out the winner by watching this little movie:


Congratulations! I will the winner a message, or if the lucky lady sees this first then she can email her details to me at: jennifer grace at hotmail dot co dot uk (no spaces).

To those who didn't win, don't be too disheartened, I'm sure I'll do another giveaway in the not too distant future as it was lots of fun!

Hope the winner enjoys their prize:


xxx

P.S. Sorry the paper flowers post is taking longer than expected, I've been having minor disagreements with a document I want to include in the tutorial. Will be posted asap! x

Saturday, 24 July 2010

giveaway...

Just a quick one to let you know my b'day giveaway (see link at top of sidebar) will close at midnight GMT tonight. I'll post the winner on monday.

I'm afraid the paper flowers post I promised will have to wait until tomorrow as I'm rushing around right now!


Bye for now xx

Friday, 23 July 2010

When I need to talk...

I turn to my sister Katy, my best friend Rosie, and my Mum. They make me laugh and they sympathise with me, and they're not afraid to be silly with me either! The latest challenge at Journaling Junkies is to journal about your inner circle of friends, the special people that you rejoice or commiserate with. Aside from my husband, it is definitely these three girlies that would be the first on my list to chat to when I need to share news, good or bad. I hope I did them justice with my layout (click on the photo to see it larger):


Thanks for being my girls!

This was my final layout for my guest stint at Journaling Junkies. I've had a great time there, and worked with some brilliant ladies, so thanks for the opportunity to Stefanie and the team. (If you'd like to see the layout on the JJ blog, or join in with the challenge yourself, click here.)

The large flowers on my layout were handmade from scraps of paper, they took a while to make but were totally worth it I think. Here's some close-ups:


I've used more to make a card for my gran, which I should be able to post tomorrow with a tutorial so you can see how to make these flowers too if you'd like! I'm also hooked on creating spiral felt flowers at the moment, but that will have to wait for another day! x

P.S. Only one day left to enter my blog giveaway! See the link on the top of the sidebar for details if you've missed it so far!

Tuesday, 20 July 2010

Kimmeridge Bay

Kimmeridge bay has a fantastic beach where you can hunt for fossils, go snorkelling, walk up the cliff path to the Clavell Tower, or just simply throw stones into the sea to hear them go 'plop'. The last option is what this layout is about (click on the photo to see it larger):


It's about a lovely evening we spent there, when I took a step back and photographed my hubby and my little girl just being together. My daughter kept passing her Daddy more pebbles to throw in, I think the game went on for a little longer than he'd have liked though - she wouldn't stop finding just 'one more'.

The page is based on the Sketchy Thursdays Guest DT challenge sketch (click the photo to see more about this):


I played around with the sketch quite a bit, but I think you can still see where it came from! As part of the challenge you also have to use yellow on your page, and use at least one handmade embellishment. I handmade the sun embellie on the right:


And I also handpainted the blue paper and the pebbles at the bottom of the layout, using salt with watercolour paints (I did a tutorial about how I created the paper on my last post here).


Doing the layout made me want to go to Kimmeridge beach again. Last time I went there was with my friend Rosie and we dared to go in for a swim, but it was too seaweedy for me. I hate it when seaweed tangles around your ankles! I will try and venture in again one day - but I'll take a snorkel next time as the underwater wildlife looked amazing, for England anyway, it's no Great Barrier Reef!

Also, just a reminder that there's only four days left until entires close for my giveaway! (Photo below.) If you want to snag yourself some entries, go here to see how! xx

Sunday, 18 July 2010

DIY patterned paper

I've decided that I don't combine my arts and crafts enough - painting has fallen by the wayside while my scrapping obsession takes over. I'm now determined to sneak some of my painting skills onto a few scrapbook layouts. I don't want to forget the techniques, or leave my paints languishing in a drawer - that would be sad.

So, in case any of you have some paints hiding in the bottom of a cupboard, perhaps that someone gifted to you or your kids and the present got put away and never used, I'm going to share with you the papers or techniques that I paint to go onto my pages. I'll start with one for watercolour paints, using rock salt to make a pattern. You can turn a white piece of paper into something like this:


It's great fun and you can play around with various stages to get different effects. If you want to give this a go here's the items you'll need:


  • 1 piece of white cardstock. If you've got watercolour paper you can use that, but it's not really necessary unless you are doing lots of layers. You might get small patches of discolouration or rougness if you use cardstock, but I think that just adds to it's homemade charm, and it doesn't always happen. I use cardstock most of the time - it's cheaper.
  • Watercolour paints,at least two colours. Preferably in tubes but I only had pans so I had to use these - more work but not impossible! I had a go at this with acrylic paints, just to see if it worked, as I know more scrapbookers have acrylics. But it doesn't work quite so well as the salt gets too stuck - acrylic is more adhesive. It might work with other paints though, if you have some lying around then give it a go!
  • Paintbrush / brushes - I used two as I needed a smaller one to get the paint from my pans, but if you're using tubes you just need a big brush, this is also what you need to apply the paint. I used a watercolour mop, but any big, clean paintbrush would do, even a decorating one. It needs to be big so you can wash the paper quickly.
  • Palette (or an old plastic plate in my case!)
  • Water
  • Rock salt, pre-grinding. If it's been ground the salt crystals will be too small and not leave such a good pattern.
Okay, once you have all these lined up, and you've protected your work surface, you need to paint the bottom layer of paint. I think it works best if the base colour is lighter than the top colour, so I chose light green. The paint will spread best if it's watery.


Leave this to dry completely. Mine took about an hour, but it will depend on how wet your paint was / how warm your room is.

For the next couple of steps you will need to move fairly quickly.

With your brush clean and wet, spread water over your base layer of paint (in painting terms this is called a wash, but don't completely soak the paper!)

Then, straight away, paint your darker colour of paint onto the water. Make sure it's dark enough that you can't see the lighter colour through too much, or you won't be left with hardly any darker colour. I chose turquoise blue:


Then, quite soon afterwards, you need to sprinkle rock salt over the paint. The wetter your paint is when you sprinkle the salt, the more of the top colour it will soak up. If you want it to soak up less, then leave it a moment - but don't let it dry or it won't absorb any of the paint. You can put the salt in patches if you want clusters of pattern rather than an all over sprinkled look like mine.


You need to leave this to dry completely, I usually leave it when I go out for the day, or leave it overnight. Once it is absolutely dry you can brush off the salt, and ta-da, your paper is finished!


I chose my colours with a particular layout in mind - I wanted it to look like the sea with coral underwater (I should be able to show you the layout tomorrow). But you could use yellow under black for a starry sky, patches of colour under black for fireworks, or different shades of yellow for beaches. I'm sure there's many other things it could sybolise, or it could just be a pretty abstract pattern to match the colours you want on your page.

I hope you've found this interesting, please let me know if you do or don't, I won't post any more tutorials like this if it helps no-one!

Bye for now xx

P.S. I should probably add that I'm not properly 'trained' in the arts, I learned to paint from books and my mum. So I'm sorry if I'm wrong about anything, but I'll only post stuff that I've tried myself and therefore I'll know works!

Wednesday, 14 July 2010

a twisted card and a knitted hat

Today I made a birthday card for a friend, which I based on the current card sketch at Twisted Sketches:

I wasn't too sure about the sketch at first, but then I saw what Lisa had done with it: taking off a few squares so she only had three (see her card here). I thought yeah, cool, I'll do that, but as usual the project progressed in it's own way, and I ended up using 5 square-ish shapes and a handmade fabric flower (click the photo to see it larger):


The twist is 'frame' so I doodled a border around the scalloped section to 'frame' the sentiment. I rummaged through my stash hoping a butterfly punch would have appeared since last time I looked, but none had, so I punched a little sunshine instead. And I quite like it, it's summery!

While I was making this, my daughter was being crafty too, by decorating my floor with teeny tiny bits of paper:


Which of course she didn't want to clear up!

The knitted hat in the post title refers to one which the fabulous Sian knitted for my daughter. You can see a post of Sian's about these hats here. I loved the post because I love the hats, and because I love the book Swallows and Amazons. Anyway, her hats may be worn by The Small One and a cousin, but here's the latest, girliest version:


My little miss demanded her 'orange' hat before we left for this walk, so it's a hit! Thanks Sian! And by the way, the skies may look blue and beatiful in the photos, but now, an hour and a half later, the black clouds are rolling in and the wind is blustering through my window. It feels like a Never Ending Story kind of night. Here's a trailer for those who don't know what I'm talking about, and for those who do, but want to be nostalgic!


My favourite movie of all time! xx

Monday, 12 July 2010

walking proud


When my daughter had just learned to walk she spent a lot of time with a huge grin on her face, looking so proud of herself. This is a layout about her first big stroll, wearing her new 'walker' trainers (as apposed to her old 'crawler' shoes). You can click on the photo to see it larger (I shall try to do this for all my photo's, but for now it's just this one):


I used the latest sketch from Sketchy Thursdays to help get me started, here's the sketch (you can see what the DT and others have done with it here):


I used strips of ribbon and card vertically on the right hand side, instead of horizontally through the middle like on the sketch. I was very pleased with myself today, as I had to fill the bobbin and change the thread on my sewing machine, and it's the first time I've managed to do it without having to check the instuction booklet!


I used butterflies in a few places to symbolise the stage of development she was going through.


I found a good 'toddler' definition sticker and a gromet that says 'get up and go' which I was pleased to discover in my stash. She certainly looks like she's keen to go places in the main photo:


The papers are from a Sandylion Disney Princess paper pad, which I bought thinking I would be using it for pages with more recent photos, but it turns out the pad is really versatile and I can use it for lots of pages. So I'm a happy bunny!

I want to make something yummy tonight, maybe biscuits or muffins or cakes. I can't decide. It might be decided for me depending on the ingredients I can find in my storecupboard! Finger's crossed there's chocolate chips left! xx

Friday, 9 July 2010

getting messy

I had a lovely afternoon yesterday. My friend Rosie came over, and, along with my little girl, we spent a few hours playing with paint. It has been a really long time since I just mucked about with paint, trying to see what it can do, and what sort of patterns it can come up with. It was interesting that a couple of times I just copied what my daughter was doing, eg dripping watery paint down from the top of her paper, and I really loved the result. When is it that we lose the ability to feel free with art? I'm going to make sure I regain a spirit of play when I'm making, otherwise where's the fun in it? Here's little miss concentrating on a difficult bit:


And the mess we grown up's were creating:


My study was full of the crafting process, so we had to take over other areas of the house with drying papers. Some were drying in the bath (on top of our cool crocodile bath mat from ikea):


And the rest were squeezed into my daughter's cot, which I'd removed the matress from:


I think we'll have to have many more afternoons like this, it was so much fun! And my daughter only put her painty hands on a few clean clothes and sheets - oh dear. More scrubbing for mummy then!

I'm hoping to use some of the papers in an art journal I want to start. I have tried to begin an art journal a few times, but I think I get scared off by blank white pages - I'm hoping having some colourful backgrounds to start on will help me get going.

I've always been useless at keeping a diary, this blog is the best record of my life that I've kept so far. Do you keep a diary or journal? If you do then why - what do you like about it?

Bye for now,
xx

Wednesday, 7 July 2010

WOYWW

I've decided to join in with 'what's on your workdesk wednesday' - something I've seen a few bloggers participating in but haven't taken part in myself before. It's quite interesting seeing what other people are up to, but normally I tidy up after myself pretty quickly, and then realise it's wednesday and there's nothing on my desk. Not so today however:


Today my desk is a mess! The most prominent feature is my sewing machine, threads, etc, which I've just used to make my daughter's Ariel doll a funky new dress:


My little girl got this Ariel doll for her b'day in March. She only came with her tail and seashell bra, and my daughter says that's just for when she's swimming, so I've been meaning to make her a dress for when she's 'on land'! Unfortunately though, it turns out I'm not a great seamstress - I fogot to leave armholes! I've just cut them out (my daughter was getting impatient!) but I'm gonna have to unpick it tonight and re-do it. Oops.

Also on my desk you can see some sandpaper, as I've been working on my next altered project for Alter it Monthly - on the theme of home sweet home. I'll let you see it when it's a bit further along! 

On the right hand side of my desk you can see some scrapbook papers and photographs that I started putting together this morning, and right at the back you can see the top of the windmills card that I posted yesterday. It's still on my desk because I had to re-stick it this morning, the double-sided tape had all come unstuck during the night! So I used my hot glue gun instead, they seem to be staying put now!

I'll have to wait until little miss has gone to bed tonight before I can nose around other people's desks! What are you working on today?

xx
Related Posts Plugin for WordPress, Blogger...