I managed to get a couple more challenges completed this evening. Thank you hubby for putting little girl to bed. Now if only he could learn to breastfeed so I didn't get interrupted by baby...!
This layout is for Shimelle's 'half page' challenge, to scrapbook only filling half a 12x12 page. This one was a real challenge for me as I don't 'do' pages with white space (in case you hadn't noticed!).
I overcame it by thinking about what Shimelle said about it showing off the patterned paper in the background. I found this Sandylion 'fairy garden' paper that has been in my stash for years. I love it as it's so pretty, but I could never use it on a page because it's overwhelming and I usually put tons of embellies on my page. By keeping the page simple and leaving half the page blank it shows it off, but still keeps the photo in the foreground:
Journaling reads: 'You really don't like standing still for photos at the moment - you always want to be dancing, waving or pulling funny faces! It can be annoying but at least you're energetic!'
I was pleased with the end result, and it was quick to scrap. I shall try this again!
I've also completed something for the 'colour story' challenge - to create a project in red, white and aqua. As I have about a million birthdays coming up in September I opted for a card:
I bought this papermania 'Happy Birthday' stamp yesterday and couldn't wait to use it. I highlighted the letters with white gel pen to make them stand out more. I think the colour combo makes the card nice and cheerful!
I'm off to bed soon so no more scrapping today. I'll try and complete a few more of the challenges this week though. Anyone else taking part? What do you think of online crops? And if you've been to real life crops then which do you prefer? I've never been to an actual crop in person, and I don't know if I'd get much done if I did - would I be too busy chatting?
Night! x
Sunday, 14 August 2011
'add to the story' & 'grid it up' Pages
The wonderful Shimelle is having another online cropping event this weekend. As I was at my best friend's wedding on Friday (photos to follow!) and didn't return until late afternoon Saturday, I haven't been able to do too much yet. But despite having to go food shopping this morning, and cooking dinner etc, I have managed to do two challenges today. Yay for hubby being off work to entertain the kids!
The first challenge I've completed was to 'add to the story' by looking back on an old scrapbook page and finding a way to add more journaling to it. I chose this 'home' layout which I created in May 2010:
I still had some of the paper with houses on, so I was able to just cut another sheet the same size as the last, and use it as a flap which could be lifted to read journaling on the back. I added the little 'open' sign so that viewers would know there's more to the story.
I enjoyed adding this description of our house. We might still remember the rooms in years to come, but we might never think to tell our daughter about it. Now she can read about it. And it's recorded in case our memories fade, and we forget things like how hard it was to mow the sloped lawn!
The next challenge I've completed was 'grid it up' - to create a layout with a grid element. I thought this one was perfect as I just had some Hipstamatic prints from my Ipod touch delivered, they worked great in a grid:
I handmade the ribbon flower, and included a button in the centre which I bought at a flea market the same day:
There's lots more challenges I want to enter! I shall try and complete another this evening. But they are open until next Sunday (21st August) so I might manage a few this week - if you want to join in too then head over to www.shimelle.com and check them out!
xxx
Thursday, 4 August 2011
Going Postal Bracelet
Julie Kirk at Notes on Paper is currently running 'Going Postal' - a mail themed blogging extravaganza, with giveaways, lots of inspiring blog posts, and the chance to join in by writing your own post which Julie can link to a Pinterest board. So here's me joining in!
I bought a bumper pack of worldwide postage stamps from Ebay a couple of years ago, and have been working my way through it by adding the odd few to cards, scrapbook layouts, or altered art projects. I wanted to do something different with them this time, so I opted for a bracelet, for some philatelist ornamentation (!):
It's very basic, as my crafting time is limited right now, but if you would like to make your own here's what I did:
1. Cut a 1.5" deep strip off the bottom of an old cardboard tube, from inside a kitchen paper roll or similar. Cut a slit up one side - it will automatically open to be a larger gap:
2. Using PVA glue, slightly watered down (mod-podge or acrylic gel medium would work too), coat the outside of the cardboard tube with stamps, overlapping them so there's no cardboard showing through. Put the PVA on the back and the front of the stamps, smoothing them down as you go so there's no bubbles and to make sure the edges are coated. I folded some over the sides of the cardboard tube, and left some showing whole so that you can see the edging to the stamp.
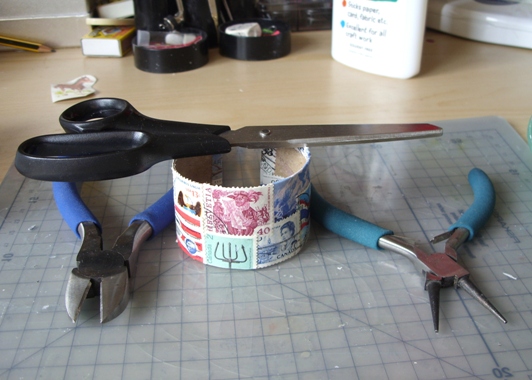
3. Once the cardboard is all covered, leave it to dry, holding it in shape with something (I used tools that were within reach!):
4. Once the PVA was dry, I then put on a coat of sparkle mod-podge to give it a nice glittery finish (you could just use plain mod-podge or more PVA if you're not a glitter lover!):
5. And I left it to dry again in the same position as before.
That's it, ready to wear! You could maybe go fancy by painting the inside to give it a more finished look, or even lining it with felt to make it softer. My bracelet seems to be holding it's shape perfectly - the gap is big enough to push the bangle onto my wrist but small enough for it to stay on - the PVA and modge-podge stiffened the tube. But if yours needs help staying on your wrist you could attach ribbons to tie the gap together.
And then wear your stamps with philatelist pride:
I was also inspired by another blogger's idea for the theme - Kirsty Neale's post on DIY deco tape using security envelopes. You can see her post here. I've been making some of my own from envelopes I'd been collecting for their funky patterns:
I haven't used them on any projects yet but I'm itching to! I'm glad I have them cut and ready to use when called for. Have you looked inside the envelopes your bills arrive in? If not, check out the next one - free, funky, patterned paper is always a plus!
x
Subscribe to:
Posts (Atom)